
I help admin a Facebook page for local homeschoolers. We have a variety of lifestyles, personalities, families, and homeschools represented. Some of our families have sought to continue to meet in person for co ops or learning pods throughout the pandemic while others have stayed home and tried to engage virtually as best they can.
In January, when the cold days of winter were settling in and park days were put on pause, I posed a question to the group asking how people were staying connected and how their kids were engaging with other kids? I asked if people were doing in person co ops or anything virtual. There was an overwhelming response indicating that if there was a virtual co op, people would join. I even had people offering to teach classes.
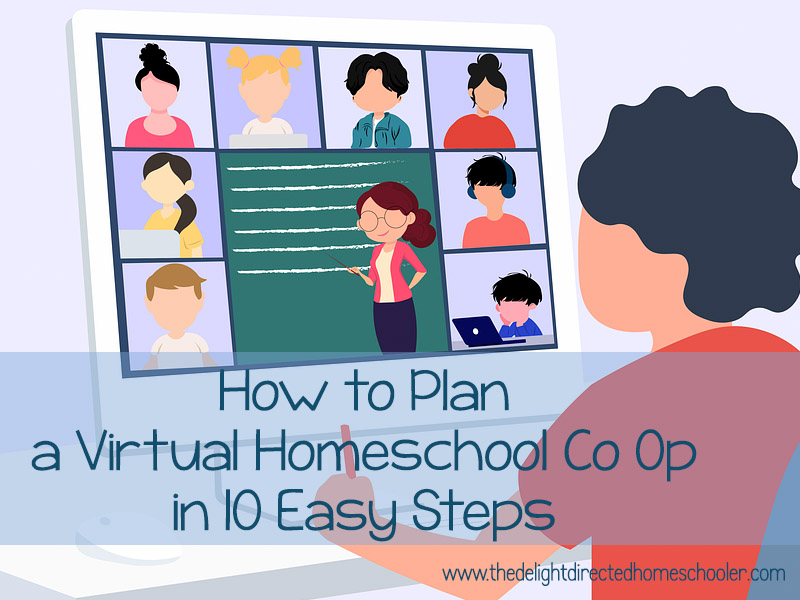
I , with the help of some really great people, was able to plan and execute a five week virtual co op for preschool- high school at no charge to the parents. The feedback we got was very positive and I would love to offer it again!
If you are interested in offering a virtual co-op, let me share my experience and some tips on how to make it happen.
- Garner interest. Are people interested in participating? You don’t want to spend all your energy planning and getting excited only to have no one respond. Do a quick survey to see who might participate. You can keep it low key and invite certain families or open it up to your local community or just go big and throw it out on a big homeschool forum that has national reach!
- Invite teachers. We have been part of an amazing homeschool community since we moved to Western North Carolina. Before covid hit, we were actively involved in enrichment classes in the spring and fall. These classes are always taught by parents. I had many of our faithful teachers message me that they had been missing teaching and would love to participate. Some expressed concerns about teaching virtually, but we figured it out!
- Pick your dates. Initially, I told the teachers that they could choose their dates and times… whatever worked best for them. We all eventually agreed to offer everything on a Friday morning. We had two class time options- 10 am and 11:30 am. This was ultimately a good idea because everything was offered at the same time, making things more streamlined. We decided to give it a try for five weeks.
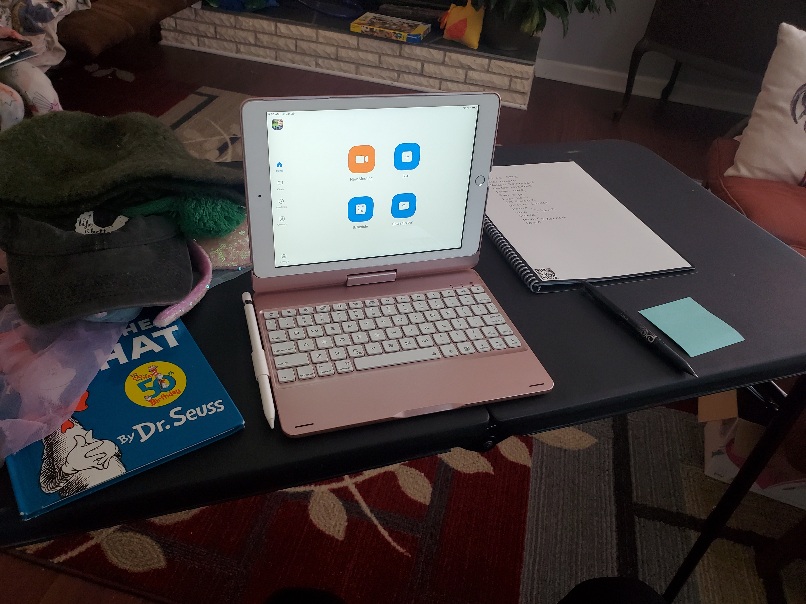
- Pick your platform. Because I was planning to offer the co-op for free to our families, I wanted to make sure to keep the cost down for the teachers. We chose to use the free Zoom platform. You can host meetings for 40 minutes using the free version. This was great because it took pressure off some of the teachers to have really lengthy lesson plans. Also, 40 minutes is about all the attention span a young learner might have, especially when you are virtual! I have also taught live classes via Facebook Live. This would be a little trickier as far as working out the timing. One way to do it would be to create a Facebook Group for your co-op and assign different time slots to the teachers. Only one class could happen per time slot and everyone in the co op would be able to access all the classes.
- Choose your class size limits. This may seem like an odd thing to consider, but I would really recommend keeping your class limits to 10-15 students. For me, I like to be able to see everyone’s face and be able to interact with them on Zoom. If you have too many kids, you may not be able to see all of them on one screen…. especially if you are using a device like a tablet or phone. If you are teaching a class for older kids that would not require much interaction, you could increase your limits.
- Gather class descriptions and supplies. I had my teachers write a brief class description and supply list. Parents were responsible for gathering the needed supplies. I encouraged teachers to communicate with their parents throughout the co op with reminders and expectations for the weekly class.
- Create a registration form and registration time. I use Google Tools for EVERYTHING. I created a registration form for the virtual co op using Google Forms. Parents could register with their name, their child’s name, contact info, age, and what classes they were choosing to take. I picked a morning when I knew I would be available to monitor the registration so I could close a class once it was full and create a waiting list for those who were interested. I closed registration about ten days before the co-op was to start.
- Communicate with your teachers. Once the registration was complete, I gathered the class lists and information and sent it to the teachers. The information given to them included student names, parent names, and parent email addresses. I asked the teachers to touch base with their parents, welcoming them to class and reminding them of supplies needed. I asked them to give the parents a general idea of what a class session would look like.
- Create a Facebook group. This step is optional, but I would recommend it if you can manage. I created a private group on Facebook for the co-op and invited all the families who were participating to join. This provided an online community where parents could ask questions and share encouragement. Teachers could post reminders and extra resources. My favorite thing was the pictures parents would post of their kids participating in the online co-op classes.
- Teach! All the prep work is done and now it is time for the show! For my teachers that were a little nervous about how to use Zoom, I created tutorials teaching them how to schedule a recurring meeting and how to share the link and password. I encouraged them to do a practice run. I even did a video of me teaching with a few devices set up around me with various Barbies and stuffed animals as participants. I show the teachers how to mute the class, how to screen share, and how to use some other features. There was a learning curve and some technical difficulties along the way, but over all it was a raging success.
The classes we offered this past winter were:
Preschool- Story time and show and tell (See below for more on this class)
Early Elementary- Community Helpers
Upper Elementary- Introduction to Drawing and International Studies
Middle School– Bible Study (Who am I In Christ) and International Studies
High School- 3d Animation and Kitchen Chemistry
For us, our biggest need came from preschool through elementary school. Most of our middle and high schoolers already had classes they were taking elsewhere.

Preschool Story Time and Show and Tell
I got to teach the preschool story time and show and tell. It was super fun and super easy. I had the sweetest kids!
The flow of the class went like this:
10:00-10:05- Welcome the children as they logged on.
10:10-10:20- Share our show and tell. I gave them a different prompt each week.
10:20-10:30- Read the Story for the week. Some of the stories were short so I read them through twice.
10:30-10:40- Talk about the story and play an active game- like Simon Says.
These are the stories and show and tell prompts I used:
Week 1- The Cat and the Hat (favorite hat)
Week 2- My Many Colored Days (something that makes you happy)
Week 3- The Snowy Day (something they wear or do on a snow day)
Week 4- A Fish Out of Water (pet or favorite stuffed animal)
Week 5- Chicka Chicka Boom Boom (Anything they want to bring)
The feedback I received from the parents was so encouraging. One family told me their kids loved having their own “conference call” just like daddy. Another child who was in my elementary drawing class loved having Zoom meetings so much he created a weekly hangout time and invited the kids from class to join him. I got to see a few of my students at an in person Valentines get together and it was so sweet to be able to give them high fives and hugs.
You can totally do this! You don’t have to be fancy. You don’t have to be techy. You just have to be willing!